Back to the Drawing Board


Creating Radial Arrays of Objects
The Radial array tool creates multiple copies of an object arranged along an arc segment.
These copies will be equally spaced along the arc segment, either by defining an explicit angular increment, or by distributing a speciied number of copies between the start and end points of the arc segment.
The object to be copied can be a symbol loaded from your filesystem or the cloud, or it can be any object picked from your drawing. This object must be a group. If it is not a group, a group will be created from the object. All of the copies in the array will be instances of the original group.
The instances (copies) can optionally be connected by arc segments. If an insert vector has been defined for the source group, the copies will be rotated such that the insert vector of each instance is tangent to the arc at the insert point. Depending on the value of the group's Insert location property, the arc can be gapped to accomodate the group.
The copied instances and the connecting arc segments will be placed on the active layer. The active layer can be changed by tapping the Layer button in the bottom app bar or in the control panel.
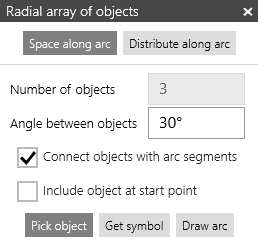
Radial array context dialog
When the Radial array tool is active, a "context dialog" appears in the drawing area. This context dialog is used to select the options needed to create the array.
There are two basic actions to be taken when creating a radial array. First, the source object must be selected, either by picking an object or by loading a symbol. Use the the Pick object or Get symbol buttons in the context dialog to indicate how the source object is selected. Once the source object has been selected, three points are entered defining the center point, start point, and end point of the arc segment along which the copies will be arranged. Additional arcs can be defined by again locating these three points. At any time you can select a new object by again tapping the Pick object or Get symbol buttons.
Space along arc
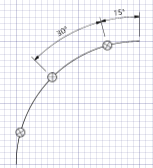
When the Space along arc option is used, each copy will be separated by an explicit angular interval. This interval value is specified in the Angle between objects box.
When the Include object at start point option is used, the first copy will be placed at the start point of the arc segment, otherwise, the first copy will be placed at half the angle interval along the arc segment. Subsequent copies will be spaced at the specified interval along the segment.
Distribute along arc
When the Distribute along arc option is used, a specific number of copies will be place along the arc segment, regardless of its included angle. The object count is specified in the Number of objects box.
When the Include object at start point option is used, the first and last copies will be placed at the endpoints of the arc segment. The remaining copies will be equally spaced along the segment.
When the Include object at start point option is not used, the arc segment will be divided into a number of intervals equal to the number of copies. The first and last copies will be spaced at half this interval from each endpoint. The remaining copies will be separated by this interval.
Connect objects with arc segments
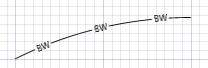
If the Connect objects with arc segments option is used, an arc object will be drawn on the active layer connecting the start point and end point of the arc segment. Depending on the settings of the groups insert vector and insert location, the arc can be gapped to accomodate the object instances.
This option can be used to draw circular "complex lines."
Include object at start point
If the Include object at start point option is set, the first copied object will be placed at the start point of the arc segment, otherwise the first copy will be placed at half the spacing interval along the arc segment.