Back to the Drawing Board
Control Panel
One of the admirable goals of Windows 8 was to provide an "immersive" experience when using apps. This means that the entire screen should be used for your content without being distracted by "chrome" (controls that are always on the screen). The designers of Windows 8 envisioned that the controls you need would appear only when you "swipe" the app bars into view (or right-click your mouse). Back to the Drawing Board supports this goal and can certainly provide this "immersive" experience, however our usability tests showed that it actually is important to have certain controls visible at all times. For this reason, we added a Control Panel on the right edge of the screen when the app is in the "landscape" orientation. This panel shows many of the controls you interact with frequently. In general, anything you can do with the bottom app bar can be done using the controls in the Control Panel. If you like the fully immersive experience, you can dismiss the Control Panel and devote the entire screen to your drawing by tapping the dismiss button at the top of the panel. You can always bring it back by tapping the Control Panel button on the right side of the bottom app bar.
Note that the Control Panel can only be shown when you are using the app in the full "landscape" orientation. If you switch to "portrait" orientation or show the app in a "split" view, the Control Panel will disappear and the button in the bottom right app bar will be disabled until you return to the full "landscape" orientation.
Tool panel
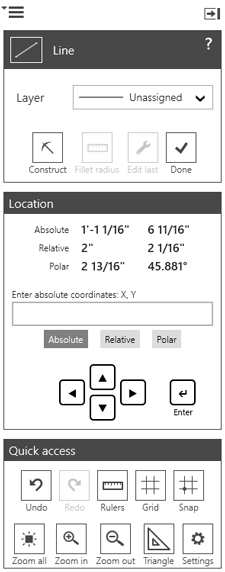
The top panel is called the Tool panel. The Tool panel shows the name of the current tool and the functions that are shown in the left side of the bottom app bar when the tool is active. If the tool is one of the draw, annotation or insert tools, a layer control lets you select the active layer for that tool. The other controls shown depend on which tool is active. Tapping any of the buttons in the Tool panel has exactly the same effect as tapping the corresponding buttons in the bottom app bar.
Location panel
The Location panel shows the coordinates corresponding to the location of the "pointer" device (mouse, stylus or your finger). The first set of coordinates (labeled "Absolute") are Cartesian model-space coordinates relative to the drawing origin. The next set of coordinates (labeled "Relative") are "delta" coordinates (horizontal and vertical offsets) relative to the last point. The third set of coordinates (labeled "Polar") show the distance and angle from the last point entered to the cursor location.
In the middle of the Location panel, below the tracking coordinates, is a text box where you can enter coordinates using your keyboard. Coordinates can be entered as absolute cartesian coordinates (x, y), relative coordinates (dx, dy), or polar coordinates (distance, angle). For a more detailed discussion of keyboard coordinate entry, please see Entering Keyboard Coordinates.
The Location panel also includes a "keypad" or set of arrow buttons that let you move the cursor by "steps." The "step" distance is the same as the grid snap value (or half the small grid size). Tapping the arrow buttons has the same effect as using the arrow keys on your keyboard.
Once the cursor has been positioned using the arrow keys, points can be entered by tapping the Enter point button.
Quick access panel
The Quick access panel consists of common functions that are useful regardless of which tool is active.
Several of the buttons are also available in the right side of the bottom app bar for all tools.


A (dislpay All) key while the drawing cursor is active.

Z (Zoom) key while the drawing cursor is active.

U (Unzoom) key while the drawing cursor is active.

