Back to the Drawing Board
Editing Images

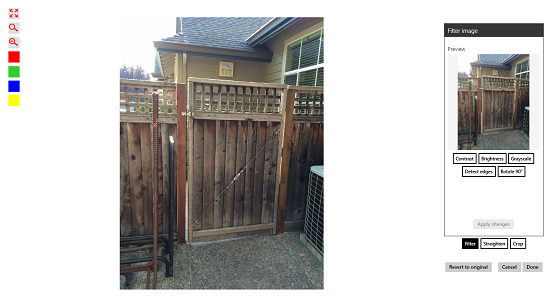
This section describes the use of the Edit Image dialog. This dialog is invoked when inserting images in the Insert image tool, or when editing images in the Edit object tool.
The Edit Image dialog is used to apply a number of image processing filters to make features in the image stand out in a drawing, or make other objects in the drawing stand out relative to the image. The dialog can also be used to crop and rotate the image, or to remove the effects of perspective so that objects in the image can be viewed as scaled 2D objects.
The Edit Image dialog takes over the full Back to the Drawing Board window. Tapping the Done or Cancel buttons dismisses the dialog and returns to the drawing window.
The current state of image being edited is shown on the left side of the dialog. This image shows all of the effects that have been applied to the image in the current editing session. There are several buttons arrainged vertically in the upper left corner of the image.
The remaining buttons (the colored squares), select the color used to draw guidlines and markers in the Straighten and Crop tools.
The box on the upper right side of the dialog is the editing panel. There are three sets of tools that can be selected using the Filter, Straighten and Crop buttons below the box. The preview image at the top of the editing panel shows how the image would look if the selected editing action was applied to the image. Tapping the Apply changes button at the bottom of the panel applies the selected action to the image. If you select a new set of tools without applying the current action, you will be asked whether you want to apply the current action. Answering Yes to this prompt is the same as tapping the Apply changes button. The editing tools are described in the sections that follow.
Below the editing panel are the Done, Cancel, and Revert to original buttons.
Applying filters
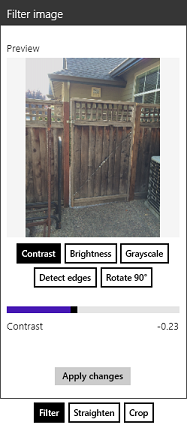
The Filter panel contains a set of image processing filters that can be used to make features in the image stand out more or less relative to other objects in your drawing.
Reducing the Contrast or increasing the Brightness of the image will tend to lighten the features in the image. This could be desirable if you want to draw objects over the drawing. A similar effect can be produced by reducing the transparancy of the image in the Properties tool.
Increasing the Contrast or reducing the Brightness of the image will tend to darken features in the image, making the image more prominent in the drawing. Using the Detect edges filter enhances lines in the image.

Contrast
The Contrast filter adjusts the contrast of the image. Contrast is the separation between the darkest and lightest areas of the image. Increasing the contrast increases the separation making shadows darker and highlights brighter. Decreasing the contrast lightens shadows and darkens highlights. The contrast value is controlled by adjusting the contrast slider. Values range from -1 to 1. The original image has a contrast value of zero.
Brightness
The Brightness filter adjusts the brightness of the image. Brightness can be thought of as the overall intensity of the image. Increasing the brighness makes the image brighter until the entire image is white. Reducing the brighness makes the image darker until the entire image is black. The brighness value is controlled by adjusting the brightness slider. Values range from -1 to 1. The original image has a brightness value of zero.
Grayscale
The Grayscale filter removes all color information from the image, making it black and white.
Detect edges
The Detect edges filter applies a "convolution" filter to the image. This filter enhances the "edges" between areas of different color or luminance. You can select various image detection algorithms (Sobel, Prewitt, etc.) from the "combo box" control. Without diving into the mathematical explanation, we'll just note that each algorithm produces different results. You can try each algorithm and determine which produces the best results for a particular image.
Rotate 90°
The Rotate 90° filter rotates the entire image by 90° (as you might expect). This can be used to change an image from portrait to landscape or fix an "upside down" image. The Rotate 90° filter is "lossless," meaning that the image quality is not degraded by applying the filter. Applying this filter four times will produce the original image. Images can be rotated by arbitrary angles using the Fix rotation tool.
Straightening images
Images can be rotated by arbitrary angles or adjusted for perspective using the Straighten tools.
Fixing rotation
The Fix rotation tool is used to rotate an image such that a specific axis or edge of an object in the image is either horizontal or vertical.
When the tool is invoked, a vertical line connecting two round markers is drawn on the main image (the reference axis). Drag the endpoint markers so that the reference axis is coincident with the edge or line that should be horizontal or vertical. The preview image will be rotated as as the reference axis is moved. Tapping the Apply changes button will apply the rotation to the main image.
Unlike the Rotate 90° filter, this is a "lossy" operation, meaning that each time the filter is applied some image data is lost. The Rotate 90° filter is preferred when rotating by increments of 90°.
Fixing perspective

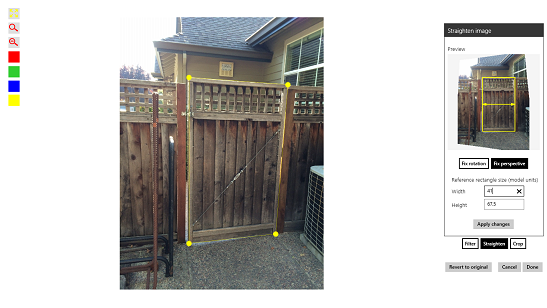
A unique and powerful feature of Back to the Drawing Board is the ability to correct for the effects of perspective in an image using the Fix perspective tool. This is done by identifying four coplaner corners of a rectangular object in the image (the reference rectangle).
When the Fix perspective tool is invoked, a rectangular figure connecting four round markers is drawn on the main image. These markers represent the four corners of the rectangular object in the image. Drag these markers to the corners of the rectangular object to define the reference rectangle. The preview image will show the corrected image as the markers are moved. Tapping the Apply changes button will apply the perspective correction to the main image.
The Reference rectangle size is the real world size of the object outlined by the reference rectangle. These values are optional. If the size is not specified, the image will be corrected for perspective, but its size will be arbitrary. If the size is specifed, the image will become a scaled object.
Entering values for the Reference rectangle size will produce a very close approximation of a scaled 2D object. The width and height values are entered in model units. When the Reference rectangle size is specified, the model size of the image object is fixed in the drawing, so make sure the model size of your drawing (the combination of paper size, model unit, and drawing scale) is sufficient to contain the scaled image object.
If the Reference rectangle size is specified, rough measurements can be taken from the corrected image using the Distance, Angle and Area tools. The accuracy of the measurements depends on a number of factors, such as the size of the reference rectangle (bigger is better), how precisely the markers are located, the trueness of the real world rectangular shape, and accuracy of the measurement of the real world rectangle. Measurements in the vicinity of the rectangle will be more accurate than measurements away from the rectangle. Of course, measurements are only valid within the plane of the rectangle.
The edges of the corrected rectangle in the resulting image will be parallel to the edges of the image object. While not absolutely necessary, the orientation of the corners of the reference rectangle should correspond to corners of the object. In other words, drag the top-left marker to the top-left corner of the object. If necessary, you can rotate the image using the Rotate 90° filter or the Fix rotation tool before fixing the perspective.
Cropping images

Images can be cropped as needed using the Crop tool.
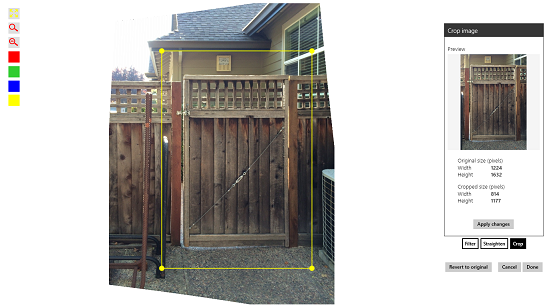
When a rectangular image is rotated by an arbitrary angle or corrected for perspective, blank trangular regions will appear at the corners of the image. These blank regions can be eliminated by cropping the image.
When the Crop tool is invoked, a crop rectangle is drawn on the main image. The size of the crop rectangle can be changed by dragging the circular markers at its corners. As the crop rectangle size is changed, the cropped image is shown in the preview area. Tapping the Apply changes button will crop the main image.


