Back to the Drawing Board


Arc
The Arc tool is used to draw circular arcs. Arcs can be defined five ways (see Construct below). The options below can be selected from the bottom app bar or from the control panel.


- Center/start/end
- The arc is defined by locating its center point, the point at which the arc starts (defining the radius), and a point to define the end of the arc.
- Three point
- The arc is defined by locating its start point, any point on its circumference, and its end point.
- Semi-circle
- A semi-circle is drawn counter-clockwise between two points.
- Radius
- The arc is defined by locating its center point, a point defining its start angle, and point defining its end angle, and a radius value. When this option is selected the Radius option described below is enabled.
- Radius & angles
- The arc is defined by locating its center point, and entering explicit values for its radius, start angle, and included angle. When this option is selected the Radius and Angles options described below are enabled.
- Fillet
- The arc is drawn tangent to two intersecting lines. The intersecting lines are defined by entering three points, A, B & C. The arc is drawn from the tangent point A on line AB to the to the tangent point on line BC. [this feature is available in version 2.0.1.6]
- Fillet & radius
- The arc is drawn tangent to two intersecting lines. The intersecting lines are defined by entering three points, A, B & C. The arc is drawn with the specified radius from the tangent on line AB to the to the tangent point on line BC. When this option is selected the Radius option described below is enabled. [this feature is available in version 2.0.1.6]

The Fill color menu specifies the color that is used to fill the object. The options are as follows:
- No fill
- The object is not filled
- Use layer color
- The object is filled using the color property of the object's layer
- Use outline color
- The object is filled using the color of the object's outline
- Select a new color
- An explicit color is selected for the fill using the Color Picker
- [Recent colors...]
- Choose from a list of colors that were recently selected in the Color Picker
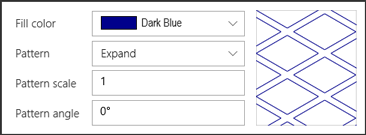
The Pattern menu specifies the vector "cross hatch" pattern that is used to fill the object. If the Solid pattern is selected, the object will be filled with a solid color.
The Pattern scale value specifies the scale for vector patterns. This option is not available when the Solid pattern is selected.
The Pattern angle value specifies the rotation angle in degrees for vector patterns. This option is not available when the Solid pattern is selected.


