Back to the Drawing Board


Select and modify a set of objects
The Select object tool modifies a set of objects in the same manner. Objects can be selected by picking them individually, or by dragging a rectangle over the objects. Objects must fall completely inside the rectangle in order to be selected. Additional objects can be added to the selection by picking them with the shift key depressed. Objects can likewise be removed from the selection by again picking them with the shift key depressed. Hitting a point where no object is present will deselect the entire set.
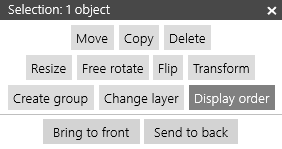
Once a set of objects has been selected, the selection is highlighted and a "context dialog" appears in the vicinity of the selection showing what modifications can be applied to the current selection. The "title bar" of the context dialog shows the number of objects in the current selection. The context dialog can be moved by dragging its title bar.
In general, a selection can be moved, copied, resized by handles, dynamically rotated, flipped (mirrored about the X or Y axis), transformed, or deleted. The selection can also be grouped so that the entire set of objects can be manipulated as a single object.
If a single object is selected, that object can be edited by choosing the "Edit object" action. Choosing this action has the same effect as selecting the object using the Edit object tool.
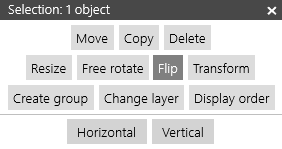
The modification actions discussed above are the "primary modification actions." When certain primary modification actions are selected, related options appear beneath the set of primary actions. The primary actions are separated from the related options by a horizontal line in the context dialog. For example, if the "Flip" actionb is selected from the set of primary actions, the related options are "Horizontal" and "Vertical."
Each of the primary modification actions are discussed below.
Move
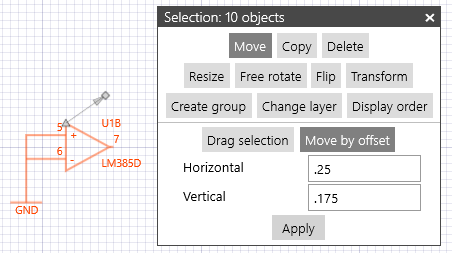
The Move action allows you to move the current selection.
If "Drag selection" is chosen from the related options, the selection can be moved by dragging any part of any of the selected objects. If an object handle is selected when the drag operation starts, that point becomes the cursor location and will snap to other object handles if they are in proximity when the drag operation ends.
If "Move by offset" is chosen from the related options, you can enter explicit values for the horizontal and vertical offsets (dx and dy). The offset vector defined by the horizontal and vertical offsets is represented graphically by a triangle marker at the beginning of the vector and a diamond marker at the end of the vector. The vector itself is represented by an arrow connecting the markers. These markers can be dragged as desired to change the offset vector. Tapping the "Apply" button will move the selection by the specified offset.
Copy
The Copy action allows you to copy the current selection and move it to a new location.
If "Drag selection" is chosen from the related options, a copy of the selection can be moved by dragging any part of any of the selected objects. The copy is created when the drag operation begins. If an object handle is selected when the drag operation starts, that point becomes the cursor location and will snap to other object handles if they are in proximity when the drag operation ends.
If "Move by offset" is chosen from the related options, you can enter explicit values for the horizontal and vertical offsets (dx and dy). The offset vector defined by the horizontal and vertical offsets is represented graphically by a triangle marker at the beginning of the vector and a diamond marker at the end of the vector. The vector itself is represented by an arrow connecting the markers. These markers can be dragged as desired to change the offset vector. Tapping the "Apply" button will create a copy of the selection and move it by the specified offset.
Delete
Choosing the Delete action will delete all of the objects in the current selection. The selection can also be deleted while using any other action by hitting the "delete" key on the keyboard.
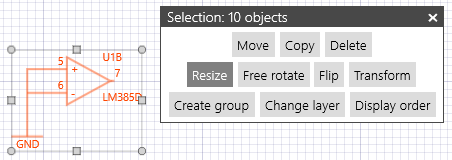
Resize
The Resize action allows you to change the scale the current selection by dragging the handles at the corners and edges of the selection box. As you drag the handles, the size of the box changes along with its contents.
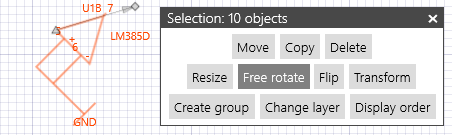
Free rotate
The Free rotate action allows you to dynamically rotate the current selection about a given pivot point.
The pivot point is identified by a triangle marker. The pivot point can be changed by dragging the pivot marker to a different location. The selection is rotated by grabbing a reference point on the selection and dragging it to a new location. The reference point is identified by a diamond marker and a reference vector is drawn connecting it to the pivot point.
Flip
The Flip action will mirror the current selection horizontally or vertically about the pivot point. Selecting Horizontal from the related options will mirror the selection horizontally about the Y-coordinate of the pivot point. Selecting Vertical from the related options will mirror the selection vertically about the X-coordinate of the pivot point.
The pivot point is identified by a triangle marker. The pivot point can be moved by dragging the triangle marker.
Transform
The Transform action will incrementally transform the current selection about the pivot point using specific scale and rotation values. The X scale, Y scale and Angle values are entered in the text boxes in the lower portion of the context dialog. The selection can be scaled uniformly or non-uniformly in the X and Y directions depending on the state of the tie bar ] button. If the tie bar button is selected, the Y scale box is disabled and the Y scale value will be the same as the X scale value.
The pivot point is identified by a triangle marker. The pivot point can be moved by dragging the triangle marker to a different location.
Tapping the Apply button will apply the transformation to the selection.
Tapping the Reset transformations button will remove any transformations applied to the object.
Create group

The Create group action is used to combine objects into a "group" so that they can be manipulated as a single object. Groups can be copied, saved, inserted, transformed and otherwise manipulated as a single object. Groups can also be saved as symbols.
By default, the origin of the new group will be the same as the origin of the first object selected when picking individual objects. When selecting objects by box, the origin will default to the center of the box.
Once the group has been created the new group will be the selection.
The origin, insert vector (used when inserting groups into line segments), and other properties can be changed using the Edit group tool.
Change layer
The Change layer action allows you to change the layer of each object in the selection.
Display order
The Display order action is used to change the display and pick order of the selected objects.
Selecting Bring to front from the related options moves the selected objects to the top of the display hierarchy. These objects will be drawn over objects that are lower in the display hierarchy. When selecting objects in a congested area, these objects be picked first.
Likewise, selecting Send to back from the related options moves the selected objects to the bottom of the display hierarchy.
Note that you can change the display/pick order of any object in any tool by selecting it with the F (bring to front) key
or the B (send to back) key.