Back to the Drawing Board
Tutorial: Text objects
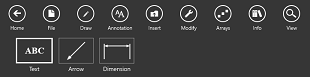
The tutorials in the next two sections cover various ways to add annotation objects to your drawing. Annotation objects include Text, Dimension, and Arrow (or "leader line") objects. The tutorials in this section cover Text objects. We'll cover Dimensions and Arrows in the next section.
In general, annotation objects are not part of your model, but rather provide information about your model. Annotation objects are created in "Paper space" as opposed to "Model space." When specifying size values for annotation object attributes (text height, arrow size, etc.) these values are defined in "paper units" (unscaled) rather than "model units."
Annotation objects can be drawn by locating points with your cursor (mouse, stylus or your finger), entering coordinates (absolute, delta or polar), or by using the arrow keys on your keyboard. Each of these techniques is covered in Drawing lines and entering points. In the tutorials that follow you will be asked to enter points at specific coordinates. You can use whichever input technique you prefer to enter the points.
Task 6.1: Set your view
The tutorials in this section assume that you have created a full-scale metric ISO A4 size drawing and have your device in the "landscape" orientation. You can review the steps to create this drawing in the Create a full-size metric A4 drawing sheet task.
In this exercise we're simply setting the view to show an enlarged area in the center part of your drawing. All of the exercises in this section will use this view.
- Verify that the control panel is visible. If it's not, make it visible by tapping the "Control panel" button in the bottom right app bar.
- Verify that the grid is visible. If not, tap the "Grid" button in the Quick access panel.
- Verify that the rulers are visible. If not, tap the "Rulers" button in the Quick access panel.
- Verify that the full extents of your drawing are visible. If not, tap the "Zoom all" button in the Quick access panel.
-
Tap the "Zoom in" button in the Quick access panel.
Depending on your screen size, you should see an area that covers roughly
(60, 80)to(220, 150).
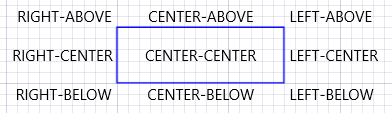
Task 6.2: Locate text with a single point using each of the alignment options
Text objects can be located using a single point or by using two points. When locating text objects using the "One point" mode, you will enter a single point, then enter a text string. The text will be positioned relative to that point according to the active "Alignment" option. The text will be horizontal (i.e. with no rotation). In this tutorial we will use the "One point" mode to enter nine text objects using each of the nine alignment options. We'll start by drawing a rectangle which we'll use to demonstrate the alignment options.
- Select the Draw tools by tapping the Draw button in the top app bar.
- Select the Rectangle tool by tapping the Rectangle button in the command bar.
- Tap the Layer button in the bottom app bar (or select from the "Layer" menu in the Tool panel). Select "Layer 010" (by default, a blue line).
- Tap the Fill button in the bottom app bar (or select from the "Fill" menu in the Tool panel) Select the "No fill" option at the top of the menu.
- Tap the Construct button in the bottom app bar (or select from the "Construct" menu in the Tool panel) Select Size.
-
Tap the Size button in the bottom app bar (or tap from the "Size" button in the Tool panel).
Enter
30for the width and10for the height. -
Enter a point at
(100, 120). You should now have a 30 mm by 10 mm blue rectangle cemtered at (115, 125). - Select the Annotation tools by tapping the Annotation button in the top app bar.
- Select the Text tool by tapping the Text button in the command bar.
- Tap the Layer button in the bottom app bar (or select from the "Layer" menu in the Tool panel). Select "Layer 001."
- Tap the Construct button in the bottom app bar (or tap the "Construct" button in the Tool panel). Select One point from the menu.
- Tap the Style button in the bottom app bar (or tap the "Style" button in the Tool panel). Select Small from the menu.
- Tap the Alignment button in the bottom app bar (or tap the "Alignment" button in the Tool panel). Select Center-above from the menu. This means that text objects will be center-aligned and offset above the point used to locate the text.
-
Move the cursor near the mid-point of the top edge of the blue rectangle. An Object snap point will appear at the actual mid-point.
Enter a point. The coordinates of this point should be
(115, 130). -
An edit text box should appear near the point located in the last step.
Type
CENTER-ABOVEin the text box and hit theEnterkey two times. You should now have the wordsCENTER-ABOVEcentered above the top edge of the blue rectangle.Text is entered as a multi-line paragraph. Each line is terminated by hitting theEnterkey. Two consecutiveEnterkeystrokes will terminate the paragraph and dismiss the Edit text box. -
Repeating the process you followed in steps 13-15, set the text alignment option to Center-center and enter the words
CENTER-CENTERat the center of the rectangle. -
Set the the text alignment option to Center-below and enter the words
CENTER-BELOWbelow the bottom edge of the rectangle. -
Set the the text alignment option to Left-above and enter the words
LEFT-ABOVEabove the top-right corner of the rectangle. -
Set the the text alignment option to Left-center and enter the words
LEFT-CENTERnext to the mid-point of the right edge of the rectangle. -
Set the the text alignment option to Left-below and enter the words
LEFT-BELOWbelow the bottom-right corner of the rectangle. -
Set the the text alignment option to Right-above and enter the words
RIGHT-ABOVEabove the top-left corner of the rectangle. -
Set the the text alignment option to Right-center and enter the words
RIGHT-CENTERnext to the mid-point of the left edge of the rectangle. -
Set the the text alignment option to Right-below and enter the words
RIGHT-BELOWbelow the bottom-left corner of the rectangle.
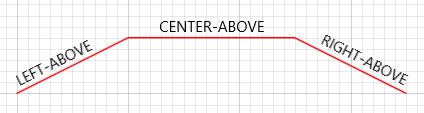
Task 6.3: Locate text with two points
When text objects are created using the two-point construction method, the text will be aligned (justified) between the two points and rotated to match the orientation of the line connecting the two points. In this tutorial we will draw a multi-segment line and use the two point method to draw text that is aligned with each segment of the line.
- Select the Draw tools by tapping the Draw button in the top app bar.
- Select the Line tool by tapping the Line button in the command bar.
- Tap the Layer button in the bottom app bar (or select from the "Layer" menu in the Tool panel). Select "Layer 008" (by default, a red line).
- Tap the Construct button in the bottom app bar (or select from the "Construct" menu in the Tool panel) Select Multi segment.
-
Enter points at
(80, 80),(100, 90),(130, 90)and(150, 80). - Select the Annotation tools by tapping the Annotation button in the top app bar.
- Select the Text tool by tapping the Text button in the command bar.
- Tap the Layer button in the bottom app bar (or select from the "Layer" menu in the Tool panel). Verify that "Layer 001" is still selected.
- Tap the Construct button in the bottom app bar (or tap the "Construct" button in the Tool panel). Select Two point from the menu.
- Tap the Style button in the bottom app bar (or tap the "Style" button in the Tool panel). Verify that Small is still selected.
- Tap the Alignment button in the bottom app bar (or tap the "Alignment" button in the Tool panel). Select Left-above from the menu.
-
Move the cursor near the first vertex of the red line. An Object snap point will appear at the vertex.
Enter a point. The coordinates of this point should be
(80, 80). Note that a rubber band line representing the axis of the text follows the cursor. Move the cursor to the next vertex of the line(100, 90)and enter a point. -
An edit text box should appear near the first point located in the previous step.
Type
LEFT-ABOVEin the text box and hit theEnterkey two times. - Set the text alignment to Center-above.
- Locate points at the second and third vertices of the line.
-
Enter
CENTER-ABOVEfor the text. - Set the text alignment to Right-above.
- Locate points at the third and fourth (last) vertices of the line.
-
Enter
RIGHT-ABOVEfor the text.
Task 6.4: Text rotation considerations
As you have seen in the previous tutorials, text can be located using one point or two points with similar results. In general, whether you use one point or two points to locate text is a matter of preference, however there is one important difference. When rotating text objects created with a single point, the location (origin) of the text object will change, but the text will not rotate. This is by design and ensures that text will be right-reading regardless of the orientation of the text object (or groups containing text objects). When rotating text objects created with two points, the text will rotate along with the rest of the model data as expected. In this tutorial we will explore this behavior.

- Select the Rectangle tool by tapping the Rectangle button under Draw in the command bar.
- Select "Layer 009" (by default, a green line).
- Verify that "No fill" is still selected.
- Tap the Construct button in the bottom app bar (or tap from the "Construct" button in the Tool panel) and verify that Size is still selected.
-
Tap the Size button in the bottom app bar (or tap from the "Size" button in the Tool panel).
Enter
20for the width and8for the height. -
Enter points at
(180, 130)and(180, 120). You should now have two 30 mm by 10 mm green rectangles stacked vertically. - Select the Text tool by tapping the Text button under Annotation in the command bar.
- Verify that "Layer 001" is still selected.
- Verify that the Small text style is still selected.
- Tap the Construct button in the bottom app bar (or tap the "Construct" button in the Tool panel). Select One point from the menu.
- Tap the Alignment button in the bottom app bar (or tap the "Alignment" button in the Tool panel). Select Center-center from the menu.
-
Move the cursor near the center of the upper green rectangle. An Object snap point will appear at the actual center.
Enter a point. The coordinates of this point should be
(190, 134). EnterONE POINTin the "edit text" box. - Tap the Construct button in the bottom app bar (or tap the "Construct" button in the Tool panel). Select Two point from the menu.
-
Move the cursor near the mid-point of left edge of the lower green rectangle. An Object snap point will appear at the actual mid-point.
Enter a point. Notice that a rubber band line follows the cursor. Enter another point at the mid-point of the right edge of the same rectangle.
Enter
TWO POINTin the "edit text" box.

- Select the Select objects tool by tapping the Select objects button under Modify in the command bar.
- Using a mouse or stylus (or your finger if you have a touch screen) select both green rectangles by dragging the selection box over the objects. Both rectangles and the text inside each rectangle should now be highlighted.
- The Select objects context dialog will appear. The context dialog shows all of the actions that can be applied to the selection. Tap the Free rotate button in the context dialog. A triangle marker should appear at the center of the selection. This marker represents the "pivot point" for the rotate transformation.
-
Again using the graphic cursor (mouse, stylus or touch), locate a point anywhere on the selection and drag the cursor to a new location.
Note that a rubber band arrow anchored at the pivot point follows the cursor and that the entire selection rotates along with the rubber band arrow.
Note in particular that the text inside the lower rectangle (
TWO POINT) rotates along with the rest of the selection while the text inside the upper rectangle (ONE POINT) always remains horizontal.
Task 6.5: Using text styles
Text attributes such as font, size, offset and spacing are assigned to text objects using named Text Styles. Using text styles enforces a consistent style for each piece of text in your drawing or across a project. Text styles can be used to specify sizes (i.e. "small", "normal", "large") or classes of text ("title", "notes", etc.). These attributes can be changed globally (affecting all text drawing using a given style) by changing the Text Style Definition in settings. Attributes can be overridden for a single piece of text by setting new values in Properties.
- Select the Text tool by tapping the Text button under Annotation in the command bar.
- Verify that "Layer 001" is still selected.
- Select "Normal" from the Text style menu.
- Tap the Construct button in the bottom app bar (or tap the "Construct" button in the Tool panel). Select One point from the menu.
- Tap the Alignment button in the bottom app bar (or tap the "Alignment" button in the Tool panel). Select "Left-above" from the menu.
-
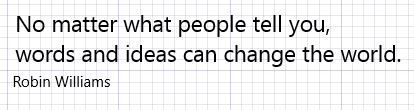
Locate a point at
(160, 80)and enter the following text:
No matter what people tell you,
words and ideas can change the world.
End each line with andEnterkey. Terminate the paragraph with an additionalEnterkey. - Change the alignment value to "Left-below".
- Select "Small" from the Text style menu.
-
Locate an additional point at
(160, 80)and enter the following text:
Robin Williams
Followed by twoEnterkeys.

- Open the settings panel by tapping the Settings button in the top app bar or control panel.
- Select Text style definitions from the list.
- Tap the "Font Family" drop-down control to the right of the "Normal" Text style name. Change the Font Family selection to "Segoe Script". Notice that the font for the quote entered in the privious steps has changed.
- Tap the "Font Family" drop-down control to the right of the "Small" Text style name. Change the Font Family selection to "Times New Roman". Notice that the font for the author's name has changed. Notice that the font has also changed for all of the text created in the previous tutorials.