Back to the Drawing Board
Tutorial: Drawing lines and entering points
The purpose of this tutorial is to show you how to draw lines and enter points in Back to the Drawing Board. While all of the exercises in this section involve drawing lines, the concepts we cover can be applied to each of the drawing and annotation tools. We'll cover some very basic skills like drawing with a mouse, using touch, entering coordinates and object snap.
If you are looking for tutorials explaining how to draw Polygons, Curves, or Doublelines see the Drawing linear objects and working with layers. tutorial. If you want to draw Rectangles, Circles, Arcs or Ellipses, see the Drawing shapes tutorial. If you want to draw Text, Arrows (leader lines), or Dimensions, see the Annotating your drawing tutorial.
Lines and other objects can be drawn by locating points with your cursor (mouse, stylus or your finger), entering coordinates (absolute, delta or polar), or by using the arrow keys on your keyboard. We will cover each of these techniques for drawing lines. These techniques can be used to draw any object.
Task 2.1: Set your view
The tutorials in this section assume that you have created a full-scale metric ISO A4 size drawing and have your device in the "landscape" orientation. You can review the steps to create this drawing in the Create a full-size metric A4 drawing sheet task.
In this exercise we're simply setting the view to show an enlarged area in the center part of your drawing. All of the exercises in this section will use this view.
- Verify that the control panel is visible. If it's not, make it visible by tapping the "Control panel" button in the bottom right app bar.
- Verify that the grid is visible. If not, tap the "Grid" button in the Quick access panel.
- Verify that the rulers are visible. If not, tap the "Rulers" button in the Quick access panel.
- Verify that the full extents of your drawing are visible. If not, tap the "Zoom all" button in the Quick access panel.
-
Tap the "Zoom in" button in the Quick access panel.
Depending on your screen size, you should see an area that covers roughly
(60, 80)to(220, 150).
Task 2.2: Draw a line using a mouse
When drawing lines with a mouse, a point will be entered at the location of the mouse cursor when the left mouse button is depressed. A "rubber band" line from the previous point will follow the location of mouse or stylus. Points can be entered anywhere, however if grid snap is active points will "snap" to the active grid. Points will also snap to object snap points if object snap is active. When drawing with the mouse, you can use the rulers at the edge of the drawing area and the coordinate display feature in the Location panel to help you precisely locate points by their coordinates.
In this exercise we will draw a line from (120, 100) to (160, 120) with the aid of the coordinate display panel.
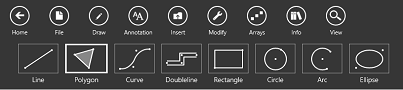
- Select the Draw tools by tapping the Draw button in the top app bar.
- Select the Line tool by tapping the Line button in the command bar (the row of rectangular buttons below the top app bar).
- Tap the Construct button in the bottom left app bar or the Tool panel. Select the Multi-segment option.
- Dismiss the app bars by tapping in the drawing area. Note that the Tool panel shows that we are now using the Line tool and that the buttons in the tool panel match the buttons in the bottom right app bar.
-
Move your cursor until the "Absolute" coordinate in the Location panel reads 120 mm 100 mm. Enter a point by clicking the left mouse button.
Note that a "rubber band" line from
(120, 100)now follows the cursor. -
Move your cursor until the "Absolute" coordinate in the Location panel reads 160 mm 120 mm.
Enter a point at
(160, 120)by clicking the left mouse button. - Tap the "Done" button in the Tool panel. This ends the definition of the current line. The "rubber band" line will no longer follow the cursor.
Task 2.3: Draw a line by entering coordinates
You can locate points by entering absolute, relative or polar coordinates in the Enter coordinates box in the Location panel.
In this exercise we will draw a line from (120, 90) to (160, 110) by entering absolute and relative coordinates.
- Verify that you are still using the Line tool. If not, repeat steps 1-4 in Task 2.2.
- Tap in the Enter coordinates box in the Location panel. Verify that the flashing keyboard cursor is present in the text box.
-
Type a,120,90 in the text box and press the
Enterkey. This will enter a point at(120, 90)using "absolute" coordinate entry.. -
Enter r,40,20 in the text box.
This will move the cursor by 40 mm in the X direction and 20 mm in the Y direction and enter a point at
(160, 110). - Enter done in the text box. This ends the definition of the current line. The "rubber band" line will no longer follow the cursor.
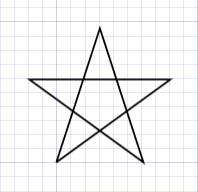
Task 2.4: Draw a five-point star using polar coordinates
You can locate points by entering polar coordinates in the Enter coordinates box in the Location panel.
In this exercise we will draw a five-point star with its lower left point at (100, 120).
- Verify that you are still using the Line tool. If not, repeat steps 1-3 in Task 2.2.
- Tap the Construct button in the bottom left app bar or the Tool panel. Verify that the Multi-segment option is selected.
-
Enter a point at
(100, 120)using any of the techniques in the previous exercises. - Tap in the Enter coordinates box in the Location panel. Verify that the flashing keyboard cursor is present in the text box.
-
Type p,20,72 in the text box and press the
Enterkey. - Enter p,20,-72 in the text box.
- Enter p,20,144 in the text box.
- Enter p,20,0 in the text box.
- Enter p,20,-144 in the text box.
- Enter done in the text box.
Task 2.5: Draw a line using construction points
When Object snap is active, diamond-shaped construction markers () will appear when you move the cursor near other objects. These markers identify available construct points such as endpoints or midpoints of lines. When you move the cursor very close to one of these markers, the marker will change to a solid (filled-in) diamond (). If you enter a point while the solid diamond is displayed, the point will "snap" to this location.

In this exercise we will draw a line from the midpoint of the line we created in Task 2.2 perpendicular to the line we created in Task 2.3.
- Verify that you are still using the Line tool. If not, repeat steps 1-3 in Task 2.2.
- Verify that Object snap is active by tapping the "Snap" button in the Quick access panel or in the bottom right app bar. Object snap is active if "Object snap" is checked in the menu.
- Move the cursor near the middle of the line we created in Task 2.2. A diamond marker should appear. Move the cursor closer to this marker until the marker is filled in . The word "midpoint" will appear briefly near the marker. Enter a point.
- Move the cursor near the middle of the line we created in Task 2.3. Two diamond markers should appear, one identified by the word "midpoint" and one identified by the word "normal." Move the cursor close to the "normal" marker until the marker is filled in . Enter a point.
- Tap the Done button in the Tool panel.
Task 2.6: Draw a line using keypad arrows
You can move the cursor by tapping the arrow buttons in the Location panel or the arrow keys on your keyboard. This is an especially convenient way to precisely locate points when using touch. It is also a great way to draw horizontal or vertical lines.
In this exercise we will draw a line from (120, 110) to (160, 130) using the arrow buttons in the location panel.
- Verify that you are still using the Line tool. If not, repeat steps 1-3 in Task 2.2.
-
Enter a point at
(120, 110)using any of the techniques in the previous exercises. Note that the absolute coordinate in the Location panel shows that the current location is 120 mm 110 mm. - Tap the right arrow button until the X coordinate shows 160.
- Tap the up arrow button until the Y coordinate shows 130.
- Tap the Enter button in the Location panel.
- Tap the Done button in the Tool panel.
Task 2.7: Draw a line using touch
If your device has a "touch" screen, you can enter points by touching the screen with your finger. Touch is not an ideal way to precisely locate points because your finger obscures the point you are trying to locate. If you find that the point isn't in the right place after you move your finger out of the way you can use the Edit last button in the Tool panel to adjust the location of the points.
In this exercise we will draw a line from (120, 80) to (160, 100) using touch.
- Verify that you are still using the Line tool. If not, repeat steps 1-3 in Task 2.2.
-
With the aid of the coordinate display panel or the rulers, enter a point by tapping at
(120, 80). Note that unlike the mouse or stylus, the cursor appears and tracks your finger while your finger is in contact with the screen and the point is entered when your finger leaves the screen. If the point you entered didn't end up at exactly the right location, don't worry. We can fix it later. -
Enter another point by tapping at (or near)
(160, 100). Note that the "rubber band" line follows your finger while it is in contact with the screen and the point is entered when your finger leaves the screen. - Tap the Done button in the Tool panel.
- Examine the line that you just created. One or both of the endpoints may not be exactly where you intended. If this is the case, tap the Edit last button in the Tool panel. This will display the Edit object context dialog. Tap the Move point button if it isn't already highlighted. Open circle markers will appear at the endpoints of the line. Tap the circle marker at the incorrectly located endpoint. The circle marker will become solid (filled in). Use the arrow buttons in the coordinate panel to adjust the location of the point.
- Tap anywhere on the screen (away from the line) to return to the Line tool.
Task 2.8: Draw single-segment lines
All line objects in Back to the Drawing Board are inherently "multi-segment" lines. That is, a single line object is a series of connected points rather than independent discreet line objects. In most of the exercises in this section we created single segment lines by tapping the Done button button after drawing a single segment. In Task 2.4 we created a five sided star with a multi-segment line.
The Line tool has a "single segment" construct option that draws lines between alternating pairs of points. Each of the resulting line segments will be part of the same line object until the line definition is terminated by tapping Done.
In this exercise we will draw an "H" shape using single-segment lines.
- Verify that you are still using the Line tool. If not, repeat steps 1-3 in Task 2.2.
- Tap the Construct button in the Tool panel and select the Single segment option.
-
Enter a point at
(130, 120)using any of the techniques in the previous exercises. Note that the "rubber band" line follows the cursor from this point. -
Move the cursor to
(130, 140)and enter a point. Note that a vertical line was drawn connecting(130, 120)and(130, 140). Also note that the "rubber band" line is no longer displayed. -
Move the cursor to
(140, 140)and enter a point. Note that no line was drawn to this point and that the "rubber band" line again follows the cursor. -
Move the cursor to
(140, 120)and enter a point. You now have two 20 mm vertical lines. -
Enter a point at
(130, 130). -
Enter a final point at
(140, 130). - Tap the Done button in the Tool panel.