Back to the Drawing Board
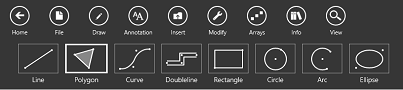
Tutorial: Drawing shapes
The tutorials in this section cover various ways to draw Rectangles, Circles, and Ellipses. Arcs are covered in the next tutorial. Unlike lines, these shapes take a fixed number of points to complete their definition. For example, a rectangle is defined by entering two points. After entering the second point, the rectangle definition is complete. Entering additional points will create additional rectangles.
Shapes can be drawn by locating points with your cursor (mouse, stylus or your finger), entering coordinates (absolute, delta or polar), or by using the arrow keys on your keyboard. Each of these techniques is covered in Drawing lines and entering points. In the tutorials that follow you will be asked to enter points at specific coordinates. You can use whichever input technique you prefer to enter the points.
Task 4.1: Set your view
The tutorials in this section assume that you have created a full-scale metric ISO A4 size drawing and have your device in the "landscape" orientation. You can review the steps to create this drawing in the Create a full-size metric A4 drawing sheet task.
In this exercise we're simply setting the view to show an enlarged area in the center part of your drawing. All of the exercises in this section will use this view.
- Verify that the control panel is visible. If it's not, make it visible by tapping the "Control panel" button in the bottom right app bar.
- Verify that the grid is visible. If not, tap the "Grid" button in the Quick access panel.
- Verify that the rulers are visible. If not, tap the "Rulers" button in the Quick access panel.
- Verify that the full extents of your drawing are visible. If not, tap the "Zoom all" button in the Quick access panel.
-
Tap the "Zoom in" button in the Quick access panel.
Depending on your screen size, you should see an area that covers roughly
(60, 80)to(220, 150).
Task 4.2: Draw rectangles by locating corners
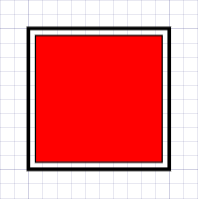
A rectangle can be drawn by locating its diagonal endpoints or by specifying its size. In this tutorial we will use the first technique to draw an open rectangle which contains a filled rectangle.
- Select the Draw tools by tapping the Draw button in the top app bar.
- Select the Rectangle tool by tapping the Rectangle button in the command bar.
- Tap the Layer button in the bottom app bar (or select from the "Layer" menu in the Tool panel). Select "Layer 002" (by default, a slightly thick black line).
- Tap the Fill button in the bottom app bar (or select from the "Fill" menu in the Tool panel) and verify that "No fill" is selected.
- Tap the Construct button in the bottom app bar (or select from the "Construct" menu in the Tool panel) and verify that Corners is selected (note that the Size app bar button is disabled.)
-
Enter a point at
(100, 120). Note that a "rubber band" rectangle follows the cursor with one corner anchored at(100, 120). -
Move the cursor to
(120, 140)and enter a point. You should now have a 20 mm by 20 mm black square. - Tap the Layer button in the bottom app bar (or select from the "Layer" menu in the Tool panel). Select "Layer 001" (by default, a thin black line).
- Tap the Fill button in the bottom app bar (or select from the "Fill" menu in the Tool panel). Choose Select a new color from the menu and select "Red" using the Color picker
- Tap the Snap button on the right side of the bottom app bar (or select from the "Snap" menu in the Quick access panel). Uncheck "Object Snap" to disable the object snap feature. Object Snap is on by default. When locating points very close to existing objects, object snap will cause points to "snap" to the existing object.
-
Enter a point at
(101, 121). Note that the "object snap" diamonds do not appear at the corners of the previously created rectangle. -
Move the cursor to
(119, 139)and enter a point. You should now have a red 18 mm by 18 mm square with a black border inside the rectangle you previously created. - Tap the Snap button on the right side of the bottom app bar (or select from the "Snap" menu in the Quick access panel). Check "Object Snap" to re-enable the object snap feature.
Task 4.3: Draw rectangles by specifying width and height
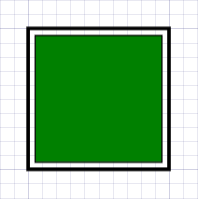
In this tutorial we will draw an open rectangle which contains a filled rectangle by specifying their sizes.
- Select the Draw tools by tapping the Draw button in the top app bar.
- Select the Rectangle tool by tapping the Rectangle button in the command bar.
- Tap the Layer button in the bottom app bar (or select from the "Layer" menu in the Tool panel). Select "Layer 002" (by default, a slightly thick black line).
- Tap the Fill button in the bottom app bar (or select from the "Fill" menu in the Tool panel) Select the "No fill" option at the top of the menu.
- Tap the Construct button in the bottom app bar (or select from the "Construct" menu in the Tool panel) Select Size. Note that the Size app bar button is now enabled.
- Tap the Size button in the bottom app bar (or select from the "Size" menu in the Tool panel) Enter 20 for both the "Width" and "Height" values.
-
Enter a point at
(140, 120). You should now have a 20 mm by 20 mm black square. - Tap the Layer button in the bottom app bar (or select from the "Layer" menu in the Tool panel). Select "Layer 001" (by default, a thin black line).
- Tap the Fill button in the bottom app bar (or select from the "Fill" menu in the Tool panel). Choose Select a new color from the menu and select "Green" using the Color picker
- Tap the Size button in the bottom app bar (or select from the "Size" menu in the Tool panel) Select Size. Enter 18 for both the "Width" and "Height" values.
-
Move the cursor in the vicinity of
(140, 120). Note that since object snap is active, a diamond marker appears at the corner of the previously created rectangle. Now hold down the shift key on the keyboard and note that object snap is temporarily disabled and the diamond marker doesn't appear.If you don't have a keyboard, temporarily disable Object snap using the technique described in the previous task. -
Enter a point at
(141, 121). You should now have a green 18 mm by 18 mm square with a black border inside the rectangle you previously created.
Task 4.4: Draw circles by locating center points
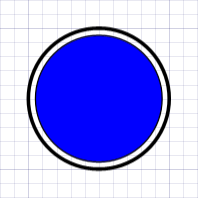
A circle can be drawn by locating its center and a point on the circumference, by locating its center point and specifying its radius, or by locating three points on its circumference. In this tutorial we will use the first two techniques.
- Select the Draw tools by tapping the Draw button in the top app bar.
- Select the Circle tool by tapping the Circle button in the command bar.
- Tap the Layer button in the bottom app bar (or select from the "Layer" menu in the Tool panel). Select "Layer 002" (by default, a slightly thick black line).
- Tap the Fill button in the bottom app bar (or select from the "Fill" menu in the Tool panel) and verify that "No fill" is selected.
- Tap the Construct button in the bottom app bar (or select from the "Construct" menu in the Tool panel) and verify that Two point is selected (note that the Radius app bar button is disabled.)
-
Enter a point at
(110, 90). Note that a "rubber band" circle follows the cursor with its center anchored at(110, 90). -
Move the cursor to
(110, 100)and enter a point. You should now have a black circle with a 20 mm radius. - Tap the Layer button in the bottom app bar (or select from the "Layer" menu in the Tool panel). Select "Layer 001" (by default, a thin black line).
- Tap the Fill button in the bottom app bar (or select from the "Fill" menu in the Tool panel). Choose Select a new color from the menu and select "Blue" using the Color picker
- Tap the Construct button in the bottom app bar (or select from the "Construct" menu in the Tool panel) Select Radius. Note that the Radius app bar button is now enabled.
- Tap the Radius button in the bottom app bar (or select from the "Radius" menu in the Tool panel) Enter 9 for the "Radius" value.
-
Enter a point at
(110, 90). Note that an object snap diamond marker appears at this location and the point snaps to the center of the previously created circle. You should now have a blue 9 mm circle with a black border inscribed in the circle you previously created.
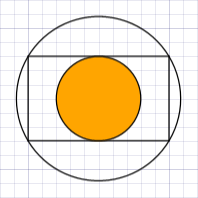
Task 4.5: Inscribe and circumscribe circles about a rectangle
In this tutorial we will draw a rectangle, inscribe a circle within the rectangle, and circumscribe a circle about the rectangle.
- Select the Draw tools by tapping the Draw button in the top app bar.
- Select the Rectangle tool by tapping the Rectangle button in the command bar.
- Tap the Layer button in the bottom app bar (or select from the "Layer" menu in the Tool panel). Select "Layer 001" (by default, a thin black line).
- Tap the Fill button in the bottom app bar (or select from the "Fill" menu in the Tool panel) Select the "No fill" option at the top of the menu.
- Tap the Construct button in the bottom app bar (or select from the "Construct" menu in the Tool panel) Select Corners.
-
Enter points at
(140, 84)and(160, 96). You should now have a 20 mm by 12 mm black rectangle. - Select the Draw tools by tapping the Draw button in the top app bar.
- Select the Circle tool by tapping the Circle button in the command bar.
- Tap the Fill button in the bottom app bar (or select from the "Fill" menu in the Tool panel). Choose Select a new color from the menu and select "Orange" using the Color picker
- Tap the Construct button in the bottom app bar (or select from the "Construct" menu in the Tool panel). Select the Two point construct option.
-
Move the cursor to
(150, 90). Note that an object snap diamond marker appears at the center of the rectangle. Enter a point. -
Move the cursor to
(150, 96). Note that an object snap diamond marker appears at the midpoint of the rectangle edge. Enter a point. You should now have an orange 6 mm circle with a black border inscribed in the rectangle you previously created. - Tap the Construct button in the bottom app bar (or select from the "Construct" menu in the Tool panel). Select the Three point construct option.
- Tap the Fill button in the bottom app bar (or select from the "Fill" menu in the Tool panel). Select the "No fill" option.
- Move the cursor to any corner of the rectangle created in step 7. Note that an object snap diamond marker appears at the corner of the rectangle. Enter a point.
- Repeat the previous step for any two additional corners of the rectangle. You should now have a circle circumscribed about the rectangle.
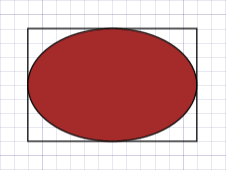
Task 4.6: Draw an ellipse inscribed in a rectangle
In this tutorial we will draw a rectangle, then inscribe an ellipse in the rectangle.
- Select the Draw tools by tapping the Draw button in the top app bar.
- Select the Rectangle tool by tapping the Rectangle button in the command bar.
- Tap the Layer button in the bottom app bar (or select from the "Layer" menu in the Tool panel). Select "Layer 001" (by default, a thin black line).
- Tap the Fill button in the bottom app bar (or select from the "Fill" menu in the Tool panel) Select the "No fill" option at the top of the menu.
- Tap the Construct button in the bottom app bar (or select from the "Construct" menu in the Tool panel) Select Corners.
-
Enter points at
(178, 122)and(202, 138). You should now have a 24 mm by 16 mm black rectangle. - Select the Draw tools by tapping the Draw button in the top app bar.
- Select the Ellipse tool by tapping the Ellipse button in the command bar.
- Tap the Layer button in the bottom app bar (or select from the "Layer" menu in the Tool panel). Verify that "Layer 001" is still selected.
- Tap the Fill button in the bottom app bar (or select from the "Fill" menu in the Tool panel). Choose Select a new color from the menu and select "Brown" using the Color picker
- Tap the Construct button in the bottom app bar (or select from the "Construct" menu in the Tool panel). Select Box.
-
Enter a point at
(178, 122). Note that an object snap diamond marker appears at the corner of the previously created rectangle. Also note that a "rubber band" ellipse follows the cursor with one corner of its incribing rectangle anchored at(178, 122). -
Move the cursor to the opposite corner of the rectangle at
(202, 138)and enter a point. You should now have a brown ellipse inscribed in the rectangle.
Task 4.7: Draw an ellipse by defining its major axis
In this tutorial we will draw a line segment, then draw an ellipse using the line as its major axis.
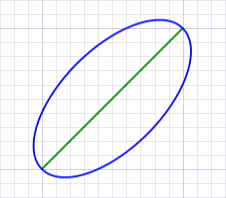
- Select the Draw tools by tapping the Draw button in the top app bar.
- Select the Line tool by tapping the Line button in the command bar.
- Tap the Layer button in the bottom app bar (or select from the "Layer" menu in the Tool panel). Select "Layer 009" (by default, a green line).
- Tap the Construct button in the bottom app bar (or select from the "Construct" menu in the Tool panel) Select Single segment.
-
Enter points at
(180, 80)and(200, 100). You should now have a 28.3 mm green diagonal line. - Select the Draw tools by tapping the Draw button in the top app bar.
- Select the Ellipse tool by tapping the Ellipse button in the command bar.
- Tap the Layer button in the bottom app bar (or select from the "Layer" menu in the Tool panel). Select "Layer 010" (by default, a blue line).
- Tap the Fill button in the bottom app bar (or select from the "Fill" menu in the Tool panel) and select "No fill".
- Tap the Construct button in the bottom app bar (or select from the "Construct" menu in the Tool panel). Select Axis.
- Tap the Size & Angles button in the bottom app bar (or select the Size & Angles button in the Tool panel) Note that since the Axis construct option is selected, only the Major:minor ratio and the Included angle fields are enabled. Verify that the Major:minor ratio is set to "2" meaning that the ellipse's major axis will be twice as long as its minor axis.
-
Enter a point at
(180, 80). Note that an object snap diamond marker appears at the vertex of the previously created line. Also note that a "rubber band" ellipse follows the cursor with one end of its major axis anchored at(180, 80). -
Move the cursor to the opposite vertex of the line segment at
(200, 100)and enter a point. You should now have a blue ellipse whose major axis is coincident with the green line.