Back to the Drawing Board
Tutorial: Drawing linear objects and working with layers
The tutorials in this section cover various ways to draw Polygons, Curves, and Doublelines.
These objects are similar to lines in that they can contain an arbitrary number of points.
After creating the initial shape, entering additional points will extend the object until the object is finished by tapping the Done button or selecting another tool.
These tutorials also introduce the concept of layers. Layers are used to logically separate related objects in your drawing, and to define the appearance of objects (color, line thickness, line weight). Layers can be visible or hidden. When a layer is hidden, all objects drawn on that layer will be hidden.
In the tutorials that follow you will be asked to enter points at specific coordinates. You can use whichever input technique (mouse, stylus, coordinate, touch, etc.) you prefer to enter the points.
Selecting layers
The tutorials in this section introduce the concept of layers. Layers define the color, line type and line weight used when drawing objects.
While you are using any of the Draw or Annotation tools, a Layer button is shown on the left side of the bottom app bar. Tapping the Layer button will display a menu showing all of the available layers in your drawing. Selecting a layer from this menu will change the active layer for the current tool. Alternatively, if the Control Panel is visible you can also select a layer using the Layer combo box in the Tool panel.
Selecting a layer from the layer menu will cause all subsequent shapes to be drawn using the new layer. If you are in the process of creating a multi-segment line, polygon, curve or doubleline when you select a new layer, the definition of that object will be ended and it will be saved on the previously active layer. Subsequent objects will be created using the newly selected layer.
Task 3.1: Set your view
The tutorials in this section assume that you have created a full-scale metric ISO A4 size drawing and have your device in the "landscape" orientation. You can review the steps to create this drawing in the Create a full-size metric A4 drawing sheet task.
In this exercise we're simply setting the view to show an enlarged area in the center part of your drawing. All of the exercises in this section will use this view.
-
Verify that the grid is visible.
If not, tap the "Grid" button in the bottom app bar or the Quick access panel,
or by tapping the
Gkeyboard shortcut. -
Verify that the rulers are visible.
If not, tap the "Rulers" button in the bottom app bar or the Quick access panel,
or by tapping the
Rkeyboard shortcut. -
Verify that the full extents of your drawing are visible.
If not, tap the "Zoom all" button in the
Quick access panel, or by tapping the
Akeyboard shortcut. -
Tap the "Zoom in" button in the Quick access panel,
or tap the
Zkeyboard shortcut while the cursor is positioned in the center of your drawing area. Depending on your screen size, you should see an area that covers roughly(60, 80)to(220, 150).
The drawing created following these steps uses the "Light" theme which includes a set of standard layers with a variety of colors, line thicknesses and line types. The tutorials that follow assume that the layer definitions haven't been changed.
Task 3.2: Draw a filled triangle using the Polygon tool
The Polygon tool is used to draw irregular polygons. A polygon is similar to a multi-segment line except that it is always closed. Polygons can be filled or not filled. If the polygon boundary intersects itself, the outside perimeter of the shape is used as the fill boundary. In other words there will be no "holes" in the fill as there would be if the "odd/even" fill rule were used.
In this tutorial, we will create an isosceles right triangle with a black outline filled with a red color.

- Select the Draw tools by tapping the Draw button in the top app bar.
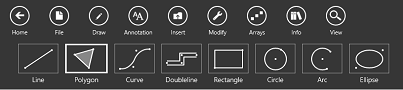
- Select the Polygon tool by tapping the Polygon button in the command bar.
- Tap the Layer button in the bottom app bar (or select from the "Layer" menu in the Tool panel). This will display a menu showing the active layers in your drawing. Each layer entry, the layer's name is shown along with a sample of a line drawn with that layer. The line sample shows the color, thickness and line type that will be used to draw on that layer.
- Select "Layer 002" (by default, a slightly thick black line).
- Tap the Fill button in the bottom app bar or the Tool panel. This will display a menu containing several fill options and a list of recently used colors. Scroll down the list and choose "Red" if it is included in the recent colors. If "Red" is not in the list, choose Select a new color. This will show the Color picker dialog. Type "red" in the color name box and tap the check button.
-
Enter a point at
(100, 120)using any of the techniques in the previous exercises. Note that the "rubber band" line follows the cursor from this point. -
Move the cursor to
(120, 120)and enter a point. Note that a horizontal line was drawn connecting the points. Also note that two "rubber band" lines follow the cursor, one connected to the previous point, the other connected to the first point. -
Move the cursor to
(120, 140)and enter a point. - Tap the Done button in the bottom app bar or the Tool panel. You should now have a red isosceles right triangle with a black outline.
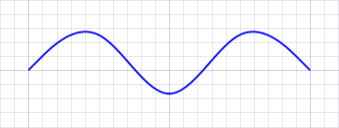
Task 3.3: Draw a wave shape using the Curve tool
The Curve tool is used to draw smooth curves. A Curve is drawn by entering a series of points, but rather than connecting the points with straight line segments, the tool draws curved segments using the "B-Spline" algorithm.
In this tutorial, we will create a blue "wave" shape.
- Select the Draw tools by tapping the Draw button in the top app bar.
- Select the Curve tool by tapping the Curve button in the command bar.
- Tap the Layer button in the bottom app bar (or select from the "Layer" menu in the Tool panel). Select "Layer 010" (by default, a blue line).
-
Enter a point at
(100, 100)using any of the techniques in the previous exercises. Note that the "rubber band" line follows the cursor from this point. -
Move the cursor to
(110, 110)and enter a point. Note that a diagonal line was drawn connecting(100, 100)and(110, 110), however the rubber band line is now a curve connecting the start point with the cursor position near, but not through(110, 110). -
Move the cursor to
(120, 90)and enter a point. -
Move the cursor to
(130, 110)and enter a point. -
Move the cursor to
(140, 100)and enter a point. - Tap the Done button in the bottom app bar or the Tool panel. You should now have a blue shape similar to a sine wave.
Task 3.4: Draw a rectangle using the Doubleline tool
The Doubleline tool is used to draw parallel multi-segment lines separated a constant width.
In this tutorial, we will create green rectangle drawn with parallel lines 2 mm apart.

- Select the Draw tools by tapping the Draw button in the top app bar.
- Select the Doubleline tool by tapping the Doubleline button in the command bar.
- Tap the Layer button in the bottom app bar (or select from the "Layer" menu in the Tool panel). Select "Layer 009" (by default, a green line).
- Tap the Fill button in the bottom app bar (or select from the "Fill" menu in the Tool panel) and verify that "No fill" is selected.
- Tap the Width button in the bottom app bar (or select from the "Width" menu in the Tool panel). Enter "2" in the "Width" box. This will be the distance between the parallel lines.
-
Enter a point at
(140, 120)using any of the techniques in the previous exercises. Note that parallel "rubber band" lines follows the cursor from this point. -
Move the cursor to
(160, 120)and enter a point. -
Move the cursor to
(160, 140)and enter a point. -
Move the cursor to
(140, 140)and enter a point. -
Move the cursor to
(140, 120)and enter a point. - Tap the Done button in the bottom app bar or the Tool panel. You should now have a green rectangle drawn with parallel lines separated by 2 mm.
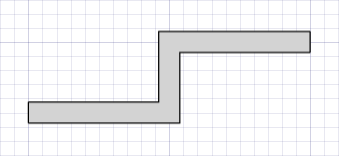
Task 3.5: Draw a filled doubleline with closed ends
In this tutorial, we will create a doubleline drawn with black lines and filled with a light gray color.
- Select the Draw tools by tapping the Draw button in the top app bar.
- Select the Doubleline tool by tapping the Doubleline button in the command bar.
- Tap the Layer button in the bottom app bar (or select from the "Layer" menu in the Tool panel). Select "Layer 001" (by default, a thin black line).
- Tap the Fill button in the bottom app bar or the Tool panel. Choose "Light Gray" using the Color picker.
- Tap the Close button in the bottom app bar or the Tool panel. This option determines whether the ends of the doubleline are open or closed. You can choose to close the start of the doubleline, the end, both or neither. Select "Both".
- Tap the Width button in the bottom app bar (or select from the "Width" menu in the Tool panel). Enter "3" in the "Width" box. The will be the distance between the parallel lines.
-
Enter a point at
(100, 70)using any of the techniques in the previous exercises. -
Move the cursor to
(120, 70)and enter a point. -
Move the cursor to
(120, 80)and enter a point. -
Move the cursor to
(140, 80)and enter a point. - Tap the Done button in the bottom app bar or the Tool panel. You should now have a 3 mm wide closed doubleline drawn with black lines and filled with light gray.
Task 3.6: Showing and hiding layers
In this tutorial we will use the Layer Definitions settings panel to show and hide layers.
- Open the settings panel by tapping the Settings button in the top app bar or in the control panel.
- Select Layer definitions from the list.
- In the Layer definitions settings panel, tap the "magnifying glass" icon next to Layer 001. This will hide Layer 001. The magnifying glass icon should dim and the doubleline created in Task 3.5 should disappear.
- Tap the magnifying glass icon next to Layer 010. This will hide Layer 010. The magnifying glass icon should dim and the curve created in Task 3.3 should disappear.
- Tap the dimmed magnifying glass icons next to Layer 001 and Layer 010. The objects on Layer 001 and Layer 010 should reappear.