Back to the Drawing Board
Tutorial: Creating drawings
The tutorial will show you how to create a new drawing in Back to the Drawing Board. Along the way, we'll cover drawing sizes, drawing units, creating layers and drawing templates.
To create a new drawing, go to the Home view. The Home view is the first view you see when you launch Back to the Drawing Board. You can always return to the Home view by tapping the Home Button in the top app bar.
Task 1.1: Create a full-size metric A4 drawing sheet
From the Home view, follow these steps to create a full-size (scale 1:1) metric A4 (297mm x 210mm) drawing sheet.
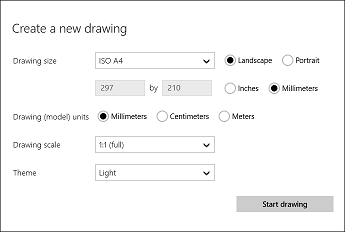
- Tap the Create a new drawing tile. This is the first tile in the Home view gallery. The Create a new drawing dialog will appear.
- From the Create a new drawing dialog, select "ISO A4" from the Drawing size control. This will create a standard ISO A4 drawing sheet that is 297mm wide and 210mm high in the landscape (or 210mm by 297mm in portrait) orientation.
- Verify that the Landscape/Portrait control is set to the "Landscape" orientation.
- Select "Millimeters" from the Inches/Millimeters control. This will select Millimeters as the paper unit for your drawing and will set your drawing environment to metric.
- Verify that "Millimeters" is selected in the Drawing (model) units control. This will select Millimeters as your model unit.
- Verify that the Drawing scale control is set to "1:1 (full)." This will result in a full-scale drawing which is appropriate if you will be drawing objects at their actual size, or if you will be creating a "non-scaled" schematic drawing or diagram.
- Verify that the "Light" theme is selected in the Theme control. This will set the color scheme for your drawing so that you have dark lines and objects on a white background.
- Tap the Start drawing button. This will dismiss the dialog and create your drawing.
At this point you're ready to start drawing.
Task 1.2: Create a 1/4"=1'0" scale ANSI B-size drawing
From the Home view, follow these steps to create a "quarter inch scale" (1/4"=1'0") ANSI B (17" x 11") drawing sheet. Note that selecting a scale in this format sets your unit environment to "Architect's" scale where units are expressed in feet and fractional inches.
- Tap the Create a new drawing tile. This is the first tile in the Home view gallery. The Create a new drawing dialog will appear.
- From the Create a new drawing dialog, select "ANSI B" from the Drawing size control. This will create a standard ANSI B drawing sheet that is 17" wide and 11" high in the landscape (or 11" by 17" in portrait) orientation.
- Verify that the Landscape/Portrait control is set to the "Landscape" orientation.
- Select "Inches" from the Inches/Millimeters control. This will select Inches as the paper unit for your drawing and will set your drawing environment to English (or Imperial).
- Select "Feet" form the Drawing (model) units control.
- Select 1/4"=1'0" from the Drawing scale control." This will result in a 1:48 scale drawing that is appropriate for applications such as architectural details or model making.
- Verify that the "Light" theme is selected in the Theme control. This will set the color scheme for your drawing so that you have dark lines and objects on a white background.
- Tap the Start drawing button. This will dismiss the dialog and create your drawing.
At this point you're ready to start drawing.
Task 1.3: Set up grids
When you create a drawing the grids are set to values that are reasonable considering the paper units, model units, drawing size and drawing scale you have selected.
If you created the B size drawing in the previous exercise you should find that your "major" grids appear every 5' and your "minor" grids appear every 6" (or half-foot). You can change the grids to appear every 4' by following these steps:
- Open the settings panel by tapping the Settings button in the top app bar or in the control panel.
- Select General from the list.
- In the General settings panel, change Major grid spacing to "4" and Grid divisions to "8"
Task 1.4: Set up layers
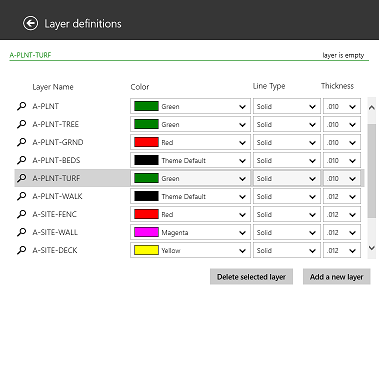
When you create a drawing in Back to the Drawing Board a set of default layers is created for you. The default layers have generic and rather uninteresting names like "Layer 001." They have a variety of color, line thickness and line type properties. The default layers might be useful to you, but you will probably want to create your own layer set that is better suited to your particular application. For example, the following naming convention might be used for drawing landscape plans:
| Layer name | Color | Line type | Line thickness | Notes |
|---|---|---|---|---|
| A-PLNT | Green | Continuous | .01 | Plants |
| A-PLNT-TREE | Green | Continuous | .01 | Trees |
| A-PLNT-GRND | Red | Continuous | .01 | Groundcover and vines |
| A-PLNT-BEDS | Black | Continuous | .01 | Planting beds |
| A-PLNT-TURF | Green | Continuous | .01 | Lawn areas |
| A-PLNT-WALK | Black | Continuous | .012 | Walkways and steps |
| A-SITE-FENC | Red | Continuous | .012 | Fencing |
| A-SITE-WALL | Magenta | Continuous | .012 | Walls |
| A-SITE-DECK | Yellow | Continuous | .012 | Decks and patios |
To add the layers in the table above to your drawing, follow these steps:
- Open the settings panel by tapping the Settings button in the top app bar or in the control panel.
- Select Layer definitions from the list.
- Tap the "Add a new layer" button below the layer list. A new layer entry will appear at the bottom of the list. It should be called "Layer 014".
- Highlight the layer name ("Layer 014") text box in the layer you just created and type "A-PLNT"
- Tap the control in the Color column in the A-PLNT row. This will bring up the Color picker dialog. Type "green" in the color name box and tap the check button.
-
Select "Solid" from the Line type control.
"Solid" and "Continuous" have the same meaning (an unbroken line with no dashes). If desired, you could add a "Continuous" line type in the Linetype definitions settings panel.
- Select ".010" in the thickness control for the A-PLNT layer.
- Repeat steps 3 through 7 for each of the other layers in the table.
If you're starting with a blank drawing, feel free to rename the default layers and set their properties as desired. This can be simpler than deleting the default layers and adding new ones.
Task 1.5: Create drawing templates
If you finished the Set up layers task above, you have probably concluded that you don't want to add a complete layer list very often. Fortunately, you only need to do it once for a specific layer list if you save your drawing as a Drawing Template.
After you have set up your drawing environment including your drawing size, paper and model units, scale, theme, grid sizes, layer definitions, line type definitions, text style definitions, arrow style definitions, and symbol library, etc., you should save your drawing as a template. This template will be your starting point for other drawings on your project. Rather than going through the steps we've covered in these exercises to create a new drawing each time, you just load a template
If you have been following along with these tutorials in order, you now have an empty 1/4"=1" scale ANSI B size drawing with layers set up for a landscape plan. In this tutorial we will save this drawing as an ANSI B size template, then save an additional ANSI A size template with the same drawing settings.
- Open the top app bar and tap the File button. Select the Save template tool from the file command bar. The Windows "File Picker" dialog will appear.
- Using the File Picker, navigate to the location where you want to save your template, enter "Landscape B" as the file name, and tap Save. You now have a B size template for the project.
- Open the settings panel by tapping the Settings button in the top app bar or in the control panel.
- Select General from the list.
- In the General settings panel, change Paper width to "11" and Paper height to "8.5". Your drawing is now an ANSI A size drawing in landscape orientation (11" x 8.5").
- Open the top app bar and tap the File button. Select the Save template tool from the file command bar.
- The File Picker should still show the folder where the B Size template was saved. Enter "Landscape A" as the file name, and tap Save. You now have an A size template for the project.
Task 1.6: Create a new drawing from a template
Now that we have drawing templates for our landscape design project, creating a new drawing is very simple. From the Home view, follow these steps to create an empty A size landscape drawing.
- Tap the Open a drawing tile. This is the second tile in the Home view gallery.
- The Windows Open File Picker will show your drawings, templates, and any DXF files you may have. Navigate to the folder where you saved your templates in the last exercise, select "Landscape A.dbtx" and tap the Open button.