Back to the Drawing Board


Inserting Groups and Symbols
The Insert group tool is used to insert groups and symbols into your drawing. Groups are created using the Select objects tool. Symbols are created by saving a group as a symbol in the Edit object tool, or by adding a group to the symbol library in the Symbols and groups settings panel. For the rest of this section, the term "group" is used to describe both symbols and groups.
When inserting groups, you first select the group you want to insert (the "active group") and then specify the location of each instance (copy of the active group). Groups can be selected from your drawing by picking them with the cursor. Symbols can be selected from the Symbol library or retrieved from disk or the cloud.
When a group is inserted into a drawing, the resulting object is called an "instance" of that group. Each instance of a given group shares the same set of members, however each instance has its own layer property, color property, transformation matrix, and text attribute values.
Group members that are on the "unassigned" layer will be placed on the active layer the group is inserted. Group members that already have layer assignments will retain those assignments when inserted.
The options described below can be found in the bottom app bar or in the control panel.


control-A keyboard shortcut.
By default, all of the symbols you retrieve using Get symbol are added to your drawing's symbol library.
The last symbol added becomes the active symbol for the insert function.

- Individual objects will be converted to anonymous groups; the copies will be instances of that group.
- Objects on unassigned layers will be moved to the active layer.
- You will be prompted to fill in any text attributes present in the group.
- Groups can be inserted into lines or doublelines if their Insert vector is set.

Filling in text attributes
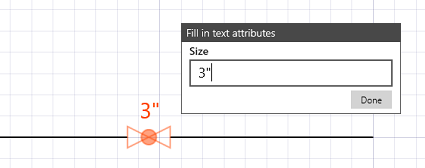
When inserting a group that contains text attributes, a dialog will appear propmting you to enter values for each of the attributes. After entering a value for the attribute, tapping the Next button will save that value to the group and move to the next attribute. When the last attribute value has been entered, tapping the Done button will dismiss the dialog.
If a text attribute has a default value, that value will be pre-populated in the attribute value box. If you do not change this value, tapping the Next (or Done) button will save the default value as the value of the attribute.
Text attributes can be single line or multi-line.
When entering values for multi-line attributes, pressing the Enter key will move to the next line.
Once the last line has been entered, pressing the Enter key will move to the next attribute.
If you don't need to enter additional lines, you can tap the Next button to move to the next attribute.
If at any time you press the Enter key in an empty text box, the dialog will be dismissed and the default values
will appear for the remaining attributes.
You can change the values of the text attributes at any time by using the Edit object tool.